 One of the projects I enjoy doing is converting a simple picture into a work of art. Several months back I took a class that told me that there is more to photography than just printing a good photo. One of the techniques I learned was how to take a photo and by using various programs, I could change what was once a picture (a photograph) into a work of art. Over the months I have converted several photos into art work, even adding matt and gloss gel medium to the top of the photo conversion using a small artist brush and layering the gel medium over the photo using the brush stokes created on the photo. The end result to this process (especially if I print the photo on canvas paper) is something that looks and has the feel of a hand painted piece of art. The gel goes on white and dries clear with a look that mimics a painter’s pallet stroke. There are additional techniques I can use to give the finished product a crackled look (as if it were very old).
Here are some examples of the steps I use to create the finished product. There is a video of the transformation at the end of this photo post.
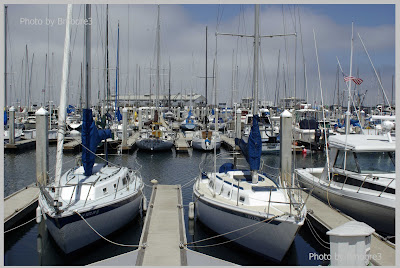
The first step, and one of the most important parts, is the actual taking of the photo (you have to start off with a good subject and photo to get the desired finished art look). I took this photo of twin sail boats that were docked in Monterey Bay Harbor. The photo was taken on August 15, 2007 around 1 P.M. (the fog bank was just off shore). Because of all the light and glare off the water, I used a polarizing filter. The ISO setting was 200 and the exposure was 1/180 of a second at F16 (the boats were brightly lit, however the background area was muted. I was about 35 feet away from the front of the boats and I used a focal length of 28mm (focal length in 35mm film is 42mm).
The second step was in my computer. There were a couple of areas that were under exposed so I bumped the exposure level up about 5%... not a whole lot, just enough to bring the whites out.
You will notice in the pictures that the photo went from a flat look to a more radiant white.
After the bump in the exposure level, I put the photo into PhotoShop CS and went to my filter menu. I have a program downloaded called “Alien Skin Snap Art” and within that program there are various types of artistic conversions (charcoal, pen and ink, pastel, posterization, and my favorite “Impasto”). I chose Impasto to convert my photo to look like a Monet style of painting. After adjusting the paint brush stoke length, texture, curvature, and a few other things that just take too long to explain, I print the photo on paper that gives me the desired look I want. Sometimes it’s high gloss professional photo paper, other times it’s matte, and at other times I use a canvas type of professional paper. Each type of paper gives the final photo a different look and feel… Sometimes I just have to do it the old “trial and error” way – print it and if it is what I like, I do the final step (the one that takes the longest amount of time and patience).
The final step is the gel. Like an artist (painter) I pick the furthest point in the photo and start the short painter’s strokes, building outward until the entire photo is covered in the gel medium. On an average 11 by 14 inch or 13 by 17 inch photo I might take up to an hour or even two to finish the strokes. On landscape photos it is much easier as nature is more forgiving than portraits. Those can take longer trying to match the texture of skin and hair. The time is worth it when you see the final piece. Its fun when someone asks you if you painted it and you explain that you didn’t and then tell them how it is a photograph conversion. I have an entire wall in my home where I have converted photos of my grandchildren into classical works of art.
Step two:
Step Three:

 Step Four: The Conversion ~
1 comment:
Hi
Plastic fishing boats tell me more about ?
Post a Comment